


[ad_1]
So this is a multi-part build report on my latest ebike project. I’ll start with a quick history, hit on the highlights of the build and my impressions, and then jump into more build details than most will care about. That’s how I like to see such articles arranged so I can see if there is any need to invest in the details based on the highlights and let’s face it, in this ultra compressed, hashtag, YouTube, tic toc world…most people don’t process detailed information very well…Kids these days.

I come from a bike background in a previous life. Some wrenching, some racing, some sales repping and even some chain-store management back in the 80’s and 90’s. I got into building bikes after suffering a severe burn injury back in 2016. I had a lot of time and needed something to engage my brain. I jumped online and eventually found there was a wealth of information from sites like this. I am mechanical by nature, and started a build to learn and also to keep my mind active. Like I said I had a lot of time to think, particularly between the hours of 1:00 AM and 6:00 AM as sleep was scarce during my recovery.

My first build was converting my Ti custom mountain bike with a Tangent Ascent motor and a 17-Ah triangle battery. I made a custom battery box and had some leather fabricated to house the electronics. That build was a beast and it got Eric Hicks’ attention (founder of Luna Cycle), and we started talking.
From there Eric and I kicked around a bunch of ideas and I told him about some thoughts I had for a battery design. Frame mounted, and attached with magnets. I offered to do a mock up of what I was thinking about, and that eventually lead to the Wolf pack form factor. Eric and his team did the hard part but it was fun to be a small part of the design process. Look Familiar?

So, on a trip to Los Angeles in May of 2019, I met up with Eric, Ashley and the team, and we did a podcast thing. You can catch it in the video link here. THAT was fun…
So the build is basically this: 2001 Schwinn Limited Production Panther frame and fork. This is a pretty cool bike that was made for two years. It uses 7005 Aluminum and a reasonable geometry (71.5/73)
Luna BBSHD mid drive
Luna Ludicrous V2 controller
Luna BBSHD Ludicrous steel gear
Eggrider display from Luna
Luna 52V 17-Ah GA-cell battery pack
Luna Wolf Pack 52V 12-Ah
Sturmey Archer 3×9 3-speed hub
Gates Centertrack belt-drive (55T/22T)
Origin8 Transit handle bars
Brooks Flyer Saddle
Light and Motion Vis-E Combo light set
Vintage Schwinn B6 Frame Tank
Custom Made Schwinn Jaguar replica rear rack
Custom made steel and carbon-fiber battery box
Custom made wood and carbon fiber fenders
BOB Ibex trailer
__________________________________________
The impressions
I have built a couple of these Schwinn Panthers and I like them a lot. I’ve got a nostalgia thing for Schwinn, and I think their cantilever cruiser frame is gorgeous. Heck, I flew to Chicago in 1988 to interview with them, and almost went to work for them. So, the frame makes for a comfy, stable and roomy ride. No surprise there for me. Gates belt drive…ditto, I have built a couple of bikes with them and I like them a lot.
Where I was surprised was with the Luna BBSHD/Steel Gear/Ludicrous V2 Controller/Eggrider package. Un-friggin-believeable! Speed, torque, control and efficiency all in a nearly silent, robust and affordable package. Also, what is pretty amazing is that out of the box for almost everyone, this thing requires no programming or tuning. My only tuning, because I am using a 3speed IGH, was that I figured I needed to keep things kind of calm on the acceleration front and frankly, I prefer a smoother ramp up regardless. So I fired up the VESC app on my Android tablet (yes theV2 Ludicrous controller is VESC compliant), extended the ramp-up for throttle and PAS to 2.5-seconds, and hit the road. The Eggrider integrates very well and brings a stealthy and easy to control solution to my left thumb. Eric is pretty amazing for him to see the need for something like this, then design, build, and program this controller. Frankly, I am not sure which of those was the hardest to do, but I am grateful he did it.
I have about 50 miles on the bike so far, and in every situation it has performed better than I could have hoped for. Riding with my wife on a leisurely Sunday morning ride, I set the PAS to 2 and it was docile. Then I wanted to blast into town for some eats, so I pegged it to 9 and zipped along at 40+ mph for a few miles. Took it off road in level 6, and was blown away at the climbing torque. Basically, it is the complete package. The only catch is the ludicrous V2 is mostly available on complete Luna bikes. If you want to purchase it on on it’s own you are going to have to 1.) Know what you are doing and 2.) Convince someone at Luna that you know what you are doing … I am not sure which one is harder. That said, if requirements #1 or #2 are not easy for you … you are far better off simply purchasing a complete bike with a Ludicrous controller from Luna.
The Details
OK, this is where many can tune out, as it covers some of the specifics of the build. This is not a “how to” manual on building an ebike, but it will fill-in some of the gaps for a knowledgeable builder about what I did, and how I did it.
The FRAME – When anyone decides to go with a belt drive, you need to put a splitter on the frame, as the belt is a continuous loop, unlike a chain which can be easily split. Best place is usually the seat stay, down near the dropout. I have done this same process before with great results. I cut the frame (a terrifying experience) with a tube cutter for a clean and controlled cut about 1.5” wide.
I had a piece of aluminum rod turned on a lathe to the same outside diameter as the seat stay. They also turned a section the same inside diameter as the seat-stay, and then machined a “flat” to exactly 1/2 of the outer diameter. Once the rod is turned, I cut it to make two matching pieces that fit the frame opening (1.5”), then drilled and tapped two holes to bolt them together. Then using 3M Scotch-Weld DP420, I epoxied the the inner parts of the frame splice into each of the frame seat stays follow the directions exactly with the DP420. These pictures should make it clear what was done. Clever huh?

The rear hub and belt drive – I went with a 9-speed cassette Sturmey-Archer with integrated 3-speed IGH, so I would have maximum flexibility in belt-line adjustment. The SA is about as robust as any IGH, aside from a Rolhoff (which I also have, but it simply has too many gears for a mid drive, as you end up shifting 3-5 gears at a time). The trickiest part of the hub fitment was making custom chain-tugs to hold the axle under the tremendous force that the BBSHD with a V2 controller can exert. For this I ended up welding some M6 bolts to the keyed locating washers of the SA hub.

Note that I had to then cut the bolts and weld them in-board so they would sit within the drop-out, and not outside of the dropout as the washer does. I then cut some aluminum U-stock for end caps that would slip over the rear dropouts. These seem pretty robust and do the trick. Yes, my welding skills could use some help…. Just wait until you see the battery box! Up front I used a 55-tooth Gates Di2 pulley. The Di2 version is designed to move the pulley out a couple of millimeters to clear a Shimano Di shifter. Flip it over and you have a pulley that sits inboard a couple of millimeters. Combined with 1.6 millimeters of chainwheel shim, and I was able to get the belt-line perfect!
The Wheels – Basic Sun Rhyno-Lite rims with DT spokes. I went with Maxxis DTH 2.3” tires, which only have about 2mm clearance in the rear of the frame on either side. We’ll see how good of a wheel builder I am by how well my tires stay off of the chain stays. The Rhyno-Lites are very robust rims with a great braking surface. Yes, I use rim brakes and they are fine. Discs would be cool, but aluminum-welding the added caliper-mounts is beyond my expertise. And I kind of like the retro vibe of the V brakes.
The Battery Box – This was a fair amount of work, but not too complicated. I got some 3.5” wide 18-gauge steel and set about to fit it as I wanted. I screwed a wood 2×4 into the side of my work bench with a 3/16” gap, and used that to help form the bends. Once I had the shape dialed in, I tack-welded the seams while it was on the bike to set the shape.

The mounting tabs for the side panels were made from small steel 20mm L-brackets that I welded in place and added M4 nutserts to them, to allow for mounting the side panels. The side panels were made from 1/8” ply that I laid up with epoxy and carbon fiber cloth. This is mostly cosmetic, but it is as easy to work with as fiberglass and it looks good. Also you can see I added a tab to the bottom of the battery box to attach the BBSHD to, for maximum stability. Of course it has a Rosenberger charging port for maximum style points. Finally, I added a small removable panel for the unplugging of the main battery, and the attaching of the auxiliary Wolf Pack battery (see below).

The Tank – This is an old Schwinn B6 tank I had laying around (I told you I had a thing for older Schwinns). Repros are available with nice shiny chrome on eBay. The tank is just a great place to consolidate some of the electronics (12V DC/DC converter, the on/off switch for the lighting, USB charging port) and even if I did not need it, I would likely add it for cool points. My authentic vintage tank was a little sad and took some work. I used bondo on a couple of holes and drilled a couple of others, so I ended up with 3 mounting points mirrored on each side. To mount the tank, I simply took some aluminum tube, cut to proper length, inserted some M4 nutserts in the ends, and then screw both sides of the tank into them. They basically clamp onto the frame and are easy to remove as needed.
The carbon fiber inlays are 3M vinyl wrap, and Schwinn was ghosted-on by applying some Schwinn lettering decals (eBay) and spraying matt clear-coat over them, and then removing the lettering. Similar technique for the Black Panther lettering on the chainstay.

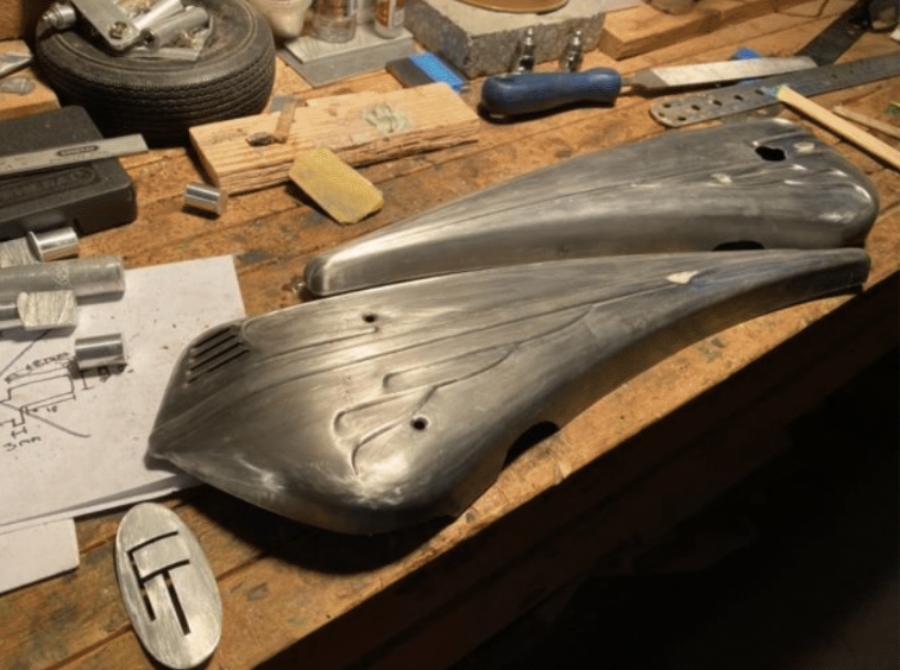
The Fenders – The stock 2001 Panther had “carbon fiber fenders” but they were basically clunky Wald chrome fenders with very cheap carbon sticker applied. Mine are made from wood, using 1/8”-thick steam-bent Ash, with a carbon fiber epoxy lay-up. Very strong and light.

The Rear Rack – This is a reproduction of a Schwinn Jaguar rack, but I modified it to fit my Panther frame perfectly. The rack also has tabs for the mounting points for my BOB trailer and can accommodate a Luna Wolf 12-Ah pack as an auxiliary battery. As a final touch, I got ahold of some reproduction Jaguar rack reflectors (crazy expensive on eBay) and added small red LED lights inside of them, and ran the wiring underneath the rack. They come on when the lights are switched on, for maximum visibility and bonus style points.

The Lights-The front and rear lights are “Light and Motion Vis-E”. They are pretty well made, also ebike friendly and they allow for remote switching.
The Internal Wiring-Also, all wires are internal. Just added to the clean lines and did not take too much effort. Since items like the rack and seat-post can sometime require removal, I used 2.1mm DC connectors. My biggest moment of fear was cutting and splicing the Bafang wiring harness. Although it looks daunting, it was pretty simple. Flux and heat-shrink tubing are your friends here.

The Trailer – Yeah I know…a trailer? I had it already, and decided to make a matching carbon fiber fender and paint it black to match the rig. As it turns out, with all of that torque, those beefy 2.3” Maxxis tires and my extended range capability, the trailer makes this the perfect gravel/dirt road machine for exploring and camping.
I live near the Blue Ridge mountains and there are literally hundreds of miles of forest roads just waiting to be ridden. Although the Wolf Pack battery fits nicely on the rear rack, I made a 5’ cable so I can place it in the trailer when I’m off-road exploring, as it lowers the CG and gives the bike more stability in the rough stuff.

That’s it. Just the highlights of what was a 14-week build. Simply put, there has never been a better time to be an ebike builder. Grateful to everyone I have learned from, and a special shout out to Eric and Luna for all they have done for the industry.
Ride on!

________________________________________________
Written by Adam Livingston, May 2021
[ad_2]
Source link


